Last Update: 2024 - 05 - 21

Summary:
The Microsoft Access integrated development environment makes it so easy and natural to implement simple event procedures that a beginner in VBA programming might fail to notice their significance and the power in the concept of events.
Access/VBA - Event handling Tutorial (Part 1) - First steps for beginners
by Philipp Stiefel, originally published November 2nd, 2015, last updated 2020-11-03

Events are a wonderful thing. When you first start programming in a modern IDE (Integrated Development Environment) you’ll probably use events without noticing it, without even knowing that they exist. – At least it was that way when I started programming. – But over time, when you are becoming more experienced in programming you will more and more see the power and marvel in the concept of events.
Events are a critical part of modern object oriented programming.
While you can get very far in VBA without ever thinking about events, I think it still can make you a better programmer if you know a couple of things about them. It will help you write better, cleaner and more elegant code.
What is an event?
Events are, well events that are associated with the objects in your development framework. In this case that is Access. In Access only the user interface elements (forms and report) have events. But the objects from additional libraries you can add as references may have events as well. An event occurs when a button is clicked, when a form is loaded or a textbox is updated with a new value.
There are hundreds of predefined events available in Access. And these event occurs nonstop during an access application is used by a user.
While these events occur all the time, they do not have any effect on your application unless you handle them. You can use either a predefined macro or you can write VBA code to handle an event. The procedures that are tied to events in VBA are called event procedures. The macro or code you bound to an event is executed each time the event occurs.
Basic event handling
Ok, let’s create a simple example to illustrate the event handling concepts in this article.
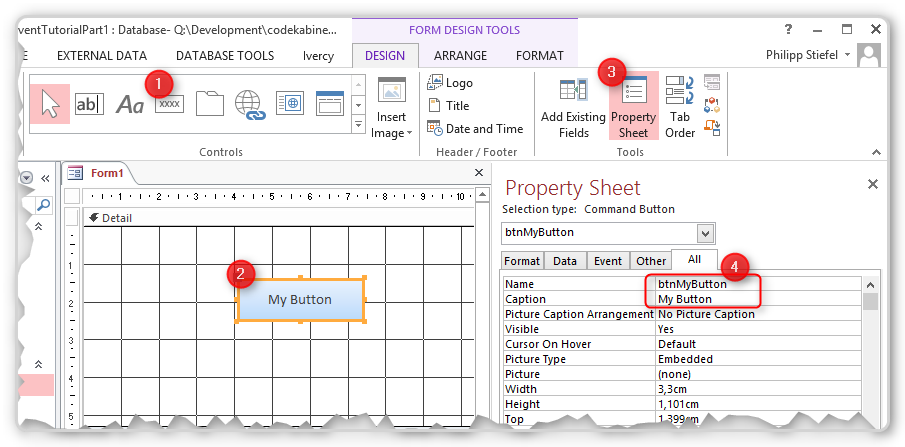
I suggest you create a new Desktop Database in Access to be your sample project. Then create a new form by clicking “Form Design” in the “Create” Ribbon tab. Then add a new button to the form by selecting the button control from the tool box (1) and selecting an area on the form (2) to place the button on the form. If the “Command Button Wizard”- Dialog appears, just click “Cancel”. - Right now we want no wizardry, but to learn how to implement things ourselves.
Make sure the “Property Sheet” is visible by clicking the button with the same name (3) in the ribbon tab “Design”. Now selecting the button on the form will display the properties for that button in the property sheet. Find and activate the tab “All”. At the top of the property list enter “btnMyButton” as Name (4) for this button and add a Caption as well.
I strongly recommend you make it a habit to enter a meaningful name for every control you add to a form. At least if you intent to do anything with this control in VBA code. There is nothing more annoying and distracting to see a “Text123” control addressed in VBA without any hint what that control might be.
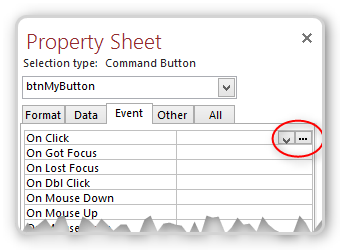
Then got to the tab “Event” in the Property Sheet and then find the “On Click” event. This event occurs each time the button is clicked. In the Property Sheet you can either choose a predefined macro from the drop down list or you can click the button with the three dots to create a new event handler.
A macro event handler
You can then choose to run the Macro Builder or the Code Builder from the Choose Builder dialog. The Expression Builder does not make any sense in the context of an event handler.
I do not like macros, because they are too limited for serious programming, but for the sake of completeness let’s create a macro event handler first. – To do this, click “Macro Builder” in the dialog.
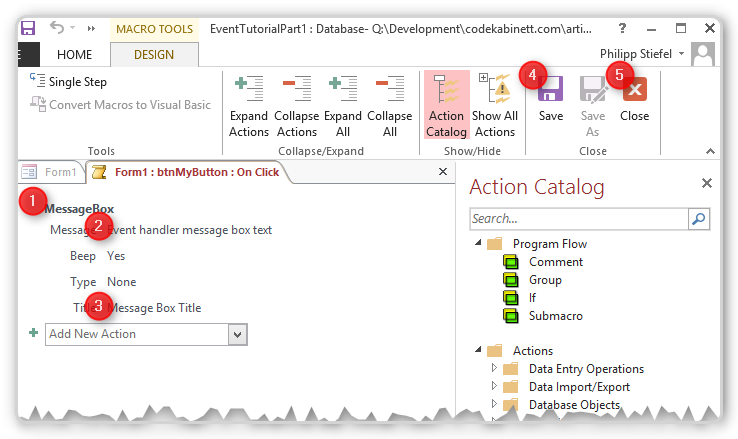
On the Macro Builder choose “MessageBox” (1) from the “Add New Action” dropdown. Then enter a Message text (2) and a Title (3). The click Save (4) and then Close (5). This will save the macro as an “Embedded Macro” with this button.
Now switch to the “Form View” of the form. Click on the button and observe a message box being displayed with whatever text and title you entered for the message box action in Macro Builder.
You can save this form for future reference if you like.
A VBA code event handler
VBA code is so much more versatile then macros. So from now on let us concentrate on how to handle events in VBA code.
Create a new form and add a new button again by repeating the steps from above. Don’t forget to name the button “btnMyButton”.
Now once again find the “On Click” event in the Event tab of the Property Sheet. Once more click the button with the three dots and then choose “Code Builder” in the Choose Builder dialog.
Now the VBA development environment starts. If you have written any VBA code before, the very first lines of VBA code you have written in Microsoft Access were probably part of an event handler. If not, they will be soon…

This is the empty scaffold of an event handler. Now place the cursor anywhere in between those lines and write this.
MsgBox "Message Box from VBA", , "VBA Event handler"
Go back to the Access main window and switch the form to Form View. Now you can click your button and the message box will appear. – Congratulations, you have written your very first VBA event handler.
The button click event is probably the most used event by far. But there are lots of other events in Access that are very useful and you are going to use more of them in any serious application.
Event procedures with Parameters
With some events it is not enough to just know that the event happened, but you will need some additional information to handle the event in a useful way.
An example for such an event is the key press event, which is fired when a keyboard key is pressed (and released) in a textbox control. In most situations it is not enough to only know that a key was pressed, but you will also need to know which key it was exactly.
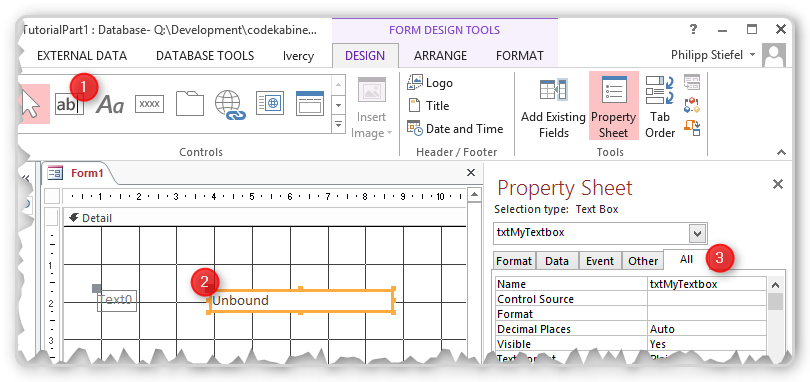
Form this part of the tutorial create a new form in design view again and this time select the Textbox control in the toolbox (1), draw it onto the form (2) and then name the Textbox “txtMyTextbox” (3).
Now let us assume you have got the requirement to allow only very few characters and numbers to be entered in that textbox. Only the letters A, B and C (upper case only!) and the numbers 1 to 6 should be allowed to be typed in this textbox.
To enforce simple rules for the input in a control, a Validation Rule is usually more appropriate than VBA code. Only complex rules might require custom VBA code.
You can achieve this by adding an event handler procedure to the KeyPress-event of the textbox. To do this find the “On Key Press” event in the textbox’s property sheet and press the …-button once more and select the Code Builder.
Notice that there is a parameter defined for the event procedure now. That parameter is named KeyAscii and is of type Integer. It will contain the numeric ASCII code for the key each time any key is typed in that textbox.

This enables us to check what character was typed by the user and to respond to it within the VBA code of our event procedure. The code for such an event procedure could look like this:
The Asc-Function used in this example returns the numeric ASCII code for the character passed to the function. With the returned values we check if KeyAscii falls into the range of allowed characters.
Now each time you (and the user) enter a character that is not supposed to be entered, a message box notifies him of that fact. – Oh boy is that annoying!
I suggest you go back to the Access main window, switch the view of the form to Form View and try for yourself.
Returning information from the event procedure to Access
So far this example showed how to react to a parameter passed to the event procedure. But the way we deal with invalid input is not ideal yet.
Luckily the developers of Access have foreseen this sort of problem. The KeyAscii parameter of the KeyPress event procedure is passed ByRef. That means it is a buffer for the ASCII code that was allocated by the Access framework for us. We can actually change the value of this parameter in our event handler procedure and the code in Access that fired the event will be able to see the new value we have written to this parameter.
Modify your event procedure to look like this.
Now, instead of showing an annoying message box, we set the KeyAscii parameter to 0. The 0 is the ASCII NUL(L) character and means something like no character at all. So after our event procedure completed, Access sees that we changed the character the user typed to no character at all and, guess what, it will not put any new character into the textbox.
By changing the values of event procedure parameters, we can change the result of the user interaction with our application. This is a very important thing to know.
The approach in this sample is not ideal for a real world validation scenario, because the user is still able to paste invalid data into the textbox. While it is useful to prevent a typing error in the textbox, it should be combined with another input validation method.
This leads us straight to the most frequent use of a parameter in an event procedure.
The Cancel parameter
The most frequently used parameter in an event procedure is probably the Cancel parameter in the Before Update event and several other events. While it is basically is no different from any other parameter in an event procedure, it is used so frequently and so important that I will dedicate a paragraph specifically to it.
The Before Update event fires either for a control like a textbox or for a whole form after new data has been entered but before the data is finally stored in either the control (e.g. textbox) or the database record bound to the form.
The Before Update event is ideal for extended data validation. In a form you can validate the data in multiple fields in order to determine if the record as a whole is valid or not. It can be used as well to check if the data in a textbox control is valid when the user is leaving the field but before the data is stored.
By setting the Cancel parameter to True you can cancel the whole update process and the new data will not be stored. As the data entered into the text would or the form would get lost, if the only the updating of the data is canceled, the user action that triggered the update (e.g. leaving the control, or leaving the current record in the form) is canceled as well.
This is ideally combined with a message box telling the user about the nature of the problem.
To implement this in our sample form, switch to the forms design view again, select the text box control and find the “Before Update”-Event in the Event tab of its property sheet. Create a new event procedure for it and write VBA code like this.
This is not much different from our original validation routine in the KeyPress-event, except that we now have to process the whole data in the textbox. To do this we iterate over each character currently in the textbox and check that it is meeting our validation criteria.
We use the Len-Function to determine the total length and the Mid-Function to extract each single character from the whole string entered. The resulting single character is then validated in the same way as in the KeyPress-example.
After completing the VBA code, switch back to Form View and paste invalid input like “XYZ999” into the textbox control and then hit the [TAB]-key to leave the control. – We cannot prevent invalid data being pasted into the control, but it cannot be stored.
The order of events
With some events you can guess when they will occur, like the Before- and After-Update-Events, there are some events, like the Form’s Open-, Load-, Close- and Unload-Event, where it is far from intuitive to know in what exact order they will occur without consulting further documentation.
One crucial thing to know is, when exactly an event will occur. This is straight forward with the button click event and the key press event, but much less so with many other useful events. Consult the documentation for details about the event you consider using.
The details of the event order is beyond the scope of this article. But there is a very informative article about the order of events for Access’s objects on Microsoft’s support website for office.
Sample code download
A ZIP-Archive with the sample database containing the code shown in this article can be downloaded here.
Feedback appreciated
I hope I was able to help you getting started with event handling in Microsoft Access with VBA. You are welcome to send any feedback by email.
If you like the article, please share it on your favorite social network.
I will never share your email with anyone. You can unsubscribe any time.
This email list is hosted at Mailchimp in the United States. See our privacy policy for further details.
© 1999 - 2024 by Philipp Stiefel - Privacy Policiy


